Translate

Tuesday, October 30, 2012

October Blog Hop - Heartfelt Creations Alumni

Today we've got a short Heartfelt Creations Alumni blog hop going, with a prize available, so we hope you'll join us and hop along :-)  You should have come here from Olga's site, and if you would like the jump to the beginning, go on over to Dina's blog.


This card was pretty quick and easy to make, and features the Poinsettia 2 PreCut Set from HC, which coordinates with Spellbinders 2011 Heirloom Ornaments die cut.

Here is the order of the blog hop - it is a short one this month!


Kristina - You are here!


The hop will close Friday November 2nd at midnight EST, so hop along and leave comments with each of the ladies between now and then for your chance to win a $25 gift certificate to shop at Heartfelt Creations.  The winner will be announced on Saturday November 3rd.


UPDATE:  The random draw for the bloghop has been done and the random winner is Lisa808.  Congratulations, Lisa!  
We have sent you an email with details, if you don't get it for any reason, send me an email.

Saturday, October 27, 2012

Ho Ho Ho

Ho Ho Ho!  I may not have been all that creative today, but I've been finding some Christmas gifts for myself!  To share with you, are a couple more unposted projects.  Plus I found a long forgotten stash of charms, dimensionals and double sided tape in my craft room, yay!

So here is yet another unposted project, this one from a couple of years ago, don't know why I never posted it for you, but here you go, I hope it inspires some fun holiday decorating:  


The cute birdhouse was made using a template I found it here.  I cut it out of Kraft paper, and sprayed the box with Walnut Gold Tattered Angels glimmer spray.  The bird is a Heartfelt Creations stamp, that was coloured with Copics then cut out with a coordinating die cut.  I made the decoration over the "door" by stamping an HC image, colouring it, adding glossy accents as well as 3 rhinestones.  I cut the roof using green coordinations paper, embossed it, then sanded it. 

Next, a super quick and easy card:

Here I used an SU digi set, printed it, cut out with A2 Card Creator dies, and added some airbrushing.  Easy peasy!

We'll see what tomorrow brings, hopefully some really fabulous fresh creations....(either that or cleaning the kitchen, hmm.....)

Easy night scene

Happy Saturday!  I hope you have all been enjoying a good weekend.

Today hasn't been particularly inky, I just couldn't decide what to work on!  First I dug out all my favourite pretty papers that are too precious to use, and thought about making something with them, and then I went and looked at some new die cuts that I got and haven't used, and then decided I needed to make some boxes to hold my cards and went through the tutorials at SCS.....not the most productive day!  

Anyway, I don't have anything new made today to share....my sample box to hold cards is a bit wonky, and I think I'll scrap this first 'prototype" and just move on to the next one.  I do have a couple of things to share with you though.

First up, I was digging through my blog trying to find a picture of this cute container I had decorated, which I could not find anywhere on my blog, so here it is (again?)...

The flower was stamped using a Heartfelt Creation stamp and cut out using the coordinating die cut.  I added some extra snips with my scissors, shaped it and then layered on top of this container, decorating with flower soft and gala glitz and robins nest due drops.  The base container is from a container of body butter, which i peeled the labels off of and ran through the dishwasher (got to love recycling/repurposing!)

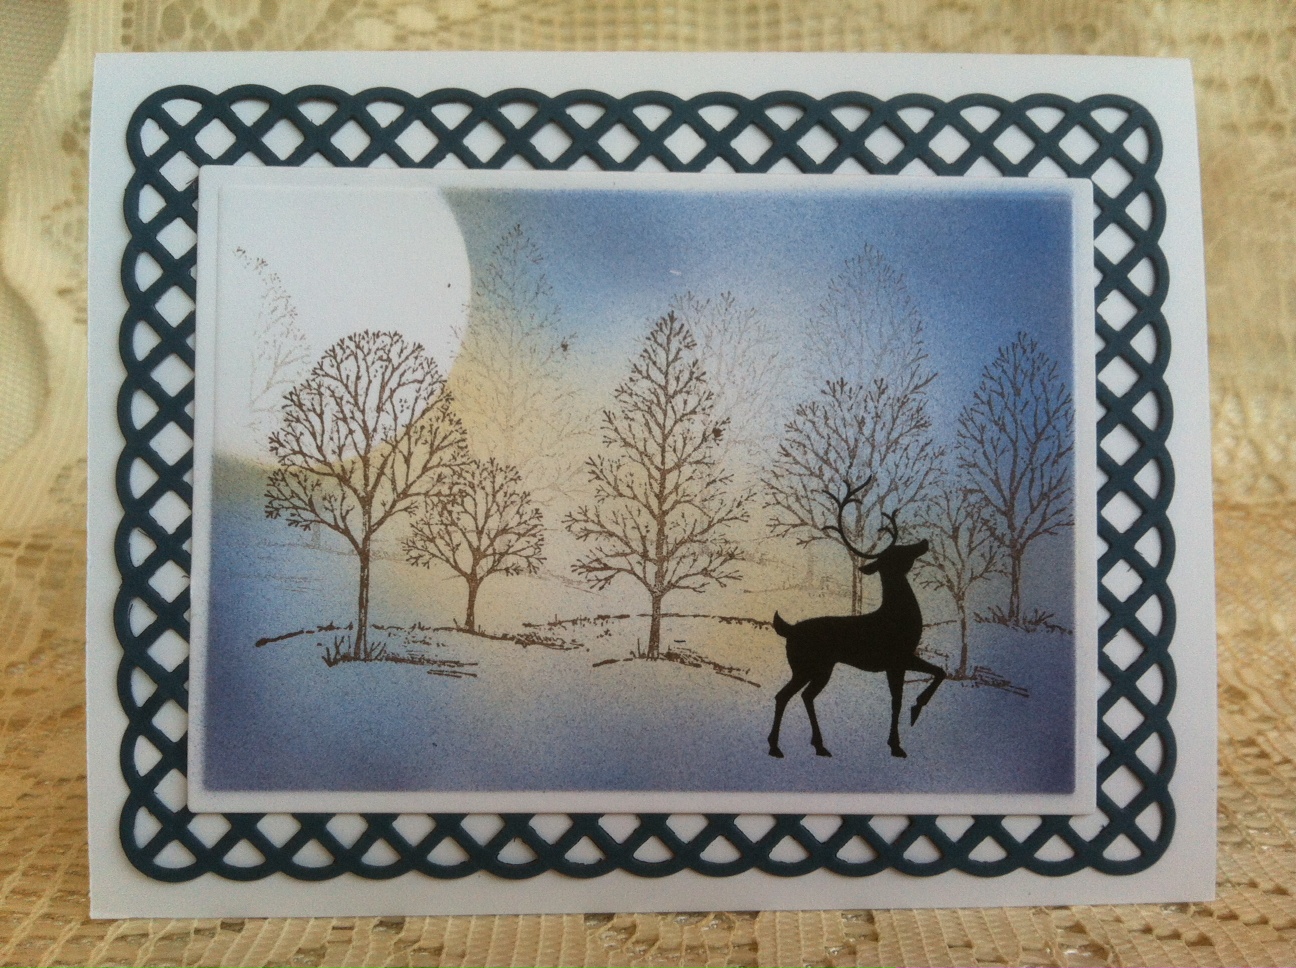
Secondly, here is a card I made recently that hadn't made it up here yet.


I've seen a lot of similar cards to this in the SU gallery and decided to CASE them since I love the peacefulness of the night scene.  The deer was printed using a digi from SU, then I stamped the trees in the background, masked the moon area with a punched circle and airbrushed the rest.  the lovely border is made using one of the A2 card creator dies by Spellbinders.

Wish me luck tomorrow, hopefully I will be more purposeful in my craft room and actually make something LOL!

Monday, October 22, 2012

Famr scene


Sunday morning is here again, hope your weekends have been good so far!

Yesterday was a very inky day, and I got 7 fabulous cards done!  My SIL and MIL and I all enjoyed a fun day together chatting and crafting away, it is so inspiring to "play" with other people.

Here is a card I made to play along with this weeks Cornish Heritage Farms challenge for a Give Thanks card in red and white.

At first when I saw the challenge I didn't have any good ideas. I thought I could only use red and white with not even black ink, but then I went through and looked at all the lovely creations by their design team and saw that yes, black ink was ok, and even a bit of other colours, so I dug out these old Scene It stamps by CHF that I have been hoarding in my craft room.

There is some very faint colouring with non red colours, so it wouldn't be too stark, but I really focused on the red.  As usual, all colouring is with Copics.  I will give this card to our local farmer, who is still providing us with fabulous weekly produce baskets.

I'm entering this card in the following challenges:

Cornish Heritage Farms - Give thanks in red and white
Cards galore - Anything goes
Avaderes - Thankfulness
Tammy's Scrapin Corner - Anything goes

Sunday, October 21, 2012

Peaceful bookmark

Another post for today, at least there's lots of variety here for you all to look at!

Here is a bookmark I made for my mom, and featuring a beautiful pussy willow image by Marks Finest Papers.

I airbrushed in light blue around the main image (by Marks Finest) in blue, as well as lightly coloured it with Copics, then added some sponging of Tim Holtz Distress ink (Linen) on the edges, added a fancy brad from SU that I'd had stashed away for about 2 years (too precious to use LOL!) and some SU ribbon for decoration.  The sentiment is from SU and was stamped using Versafine Onyx Black, my favorite ink to use for sentiments since it is so crisp.

My mom reads a lot and lives far away, so this is easy to mail and will make her think of me when she uses it, so I am really happy to have made it.

I'm entering this bookmark in the following challenges:


Marks Finest Papers, FOSTV Altered item/not a card
Inky Impressions, Anything but a card
Crafty Sentiments, Ribbon or bows
Stamptacular Sunday, No Rules
Creative Inspiration, Anything goes
Through the craftroom door - Anything goes

Featuring the sentiment

Here are a couple more of my weekend creations.  I just love how the die cuts accent the sentiments without needing any other images (or colouring!)  Both were super quick to make and look gorgeous in real life.

 
The first one, above, features my newest die cut, the Orchard Frame set from Memory Box, as well as a fancy label from Spellbinders.  I airbrushed some colour in the background.  The sentiment in it, as well as the one below, are both from a Gina K set called Tree Silhouettes.  

 The second card, below, uses Spellbinders dies.  I used the Bow Easy to make the gorgeous bow, and used black craft ink lightly on the edges of the plum papers in order to give some extra depth.

I'm entering both these cards in the following challenges:
Gina K Stamp TV - Feature the Sentiment 
One Stop Craft Challenge - Anything Goes
4 Crafty Chicks - Dry embossing
Craft Spot - Emboss it
Jackson's Digital - CAS using 2 dies (see top card)
Paper Pretties - Sentiment as the focal point


Christmas Roses

Christmas is only two months away!!!   I have started working on more Christmas cards so that I am ready this year, and unlike prior years, this time I'm actually going to mail the cards before New Years LOL!

This is a Flourishes image featuring Christmas roses.  It's been coloured with Copics.  All layers were die cut with the A2 Card Creator dies by Spellbinders, except for the sentiment,

I'm entering this card in the following challenges:
Flourishes - Winter Inspiration
 ABC Christmas Challenge - U is up to you
Totally Paper Crafts - Christmas
Hiding in my craft room - Die Cuts
Fussy and Fancy - Anything goes

Christmas Window Scene

Here are a couple more cards that I made with my Grand Madison Window die.  This die was a birthday gift from my family, and I have had a lot of fun creating different cards with it, some looking outside, and these ones looking inside.


In this one (above) I stamped the tree using Tim Holtz Walnut distress ink, and heat embossed with clear embossing  powder, then coloured with green Copics.  used copics and sponging to add colour in the background of the tree.  When dry embossing the background brick wall, I first inked the embossing folder with black craft ink.  The curtains are made using some lace from the fabric store.  I've added red liquid pearls to the nose of the deer.


In this second card, I stamped the tree using green ink, and then sponged green colour over it, and then just added colour to some key ornaments with Copics.  The rest is pretty much the same as the other one.

I'm entering these cards in the following challenges:
 Flourishes - Winter Inspiration
 Christmas Card Challenge - Bows
Jingle Belles - Holiday Creatures
ABC Christmas Challenge - U is up to you
Totally Paper Crafts - Christmas
Hiding in my Craft room - Die Cuts

Wednesday, October 17, 2012

Festive forest

Here is another similar card to the last, however I decided to try balancing out the layout with another embellishment on the side and to use the holly leaves rather than the flourishes.  I think this came out more balanced than the other one.

I'm entering this card in the following challenges:
Simon Says Stamp & Show - Your favourite ....Graphic 45 papers
Gina K - Friday challenge - Christmas card with Distressing
ABC Christmas Challenge - U is for up to you 
Anything goes - make your own embellishment (the poinsettia)
Through the craft room door - anything goes

Distressed Xmas card

The week is passing by, and I've been wanting to play with a few of the challenges this week before they expired!  Here is another simple Christmas card, which is standard mailing size but glitzed up with pretty homemade embellishments, heat embossing, and gorgeous papers.


The image is from Gina K, a set called Tree Silhouettes.  The paper is my very favourite paper of all time, Graphic 45 Christmas Emporium (must have bought about 6 of these paper packs!!), the flower was made using my trusty Spellbinders dies, and the flourish is a Cheerie Lynn one, I believe.

The trees were stamped first in Vintage Sepia Versafine, and then the top tree was stamped in Versamark and then heat embossed with Copper embossing powder.  The edges have been distressed with scissors and some brown craft ink.

I'm entering this card in the following challenges:
Simon Says Stamp & Show - Your favourite ....Graphic 45 papers
Gina K - Friday challenge - Christmas card with Distressing
ABC Christmas Challenge - U is for up to you 
Anything goes - make your own embellishment (the poinsettia)

Tuesday, October 16, 2012

Woodland fairy

Hallo folks!
I hope you are all enjoying the transition to fall!  Today I finally dug out my winter coat, but it sure is sad to say good-bye to summer.
Here is a card I made to help us look forward to next spring and summer, when the forests will be green again and everything fresh and alive.  For myself, to carry me through till then, I'll also be planning a trip involving palm trees :-)  hmm, maybe I need to make a card featuring a frothy drink, LOL!  Anyway, while winter is here and we spend time indoors thinking of the outdoors, here is a card to help  us dream.


The fairy image is a digi from Mo Manning called Spring Fairy Aleta--isn't she adorable??!  The ferns are in to sizes and are from Heartfelt Creations.  There is brown craft ink in areas to add some depth, and I've dressed it up with tule, rhinestones, and pearls.

I'm entering this card in the following challenges:

Simon Says - Dies and or punches
Mo's digital pencil challenge - "B is for..."  my interpretation is.... BLING
Paper Play Challenges - Simply cute
Simon Says Stamp & Show - Your favourite .... mine is the forest, I love the forest, and pics of woodland glades, and here we have a fairy in a ferny woodland glade :-)
Top Tip Tuesday - Things with wings
The Shabby Tea Room - Rustic Elegance

Monday, October 8, 2012

She's all that - Birthdays

Happy Monday!  I hope you all had a fabulous weekend, and for those of you in Canada  great Thanksgiving.

I've updated my blogger background, what do you think?  Have any of you changed your blogger templates lately and have suggestions?  Also, if any of you have trouble leaving comments or viewing my blog, please send me an email, which is available in my blogger profile.

Below I've got some cards and entering them in some challenges, one more complicated than the rest,
here are the first couple, going with a simple colour scheme of just the black, white and cameo coral.  The fancy edges are made using the A2 Card Creator dies and the one uses an old cuttlebug embossing folder that I thought tied in well.  The cake is coloured brown and the candle has a yellow flame and there are a few bit of other coloured items too.

The one on the right I am entering in Flourishes challenge for World Card Making day to focus on the 5 senses.  For me, the sight of the girl carrying the cake makes me think of our family birthday parties, and as soon as the person walks out of the kitchen carrying the lighted cake, we all start singing happy birthday (hearing), it always smells sweet (here chocolaty) and then we get to eat it--yum! (smell and taste), I used a textured embossing folder for the candles, which make me think of heat (feel), and my eye is drawn by the little bit of colour incorporated in to the image (sight).


The next couple are more colourful, one of them using some very busy DP that has been collecting dust, combined with an embossing folder again, and the other uses an old background stamp.


I am entering the following challenges with these cards:
Flourishes, World Card Making Day 5 senses (see explanation above, after the first photo)
Fab & Funky - No DP (all of these would qualify except for the second to last one)
Sentimental Sundays - Anything goes
De Creative Zebra - Anything goes

Sunday, October 7, 2012

Flourish with faux layers

Another fall themed card, to celebrate Thanksgiving weekend here in Canada.


I started off by sponging the base using Tim Holtz Scattered Straw distress ink and then a brown craft ink.  I then stamped the sentiment (a retired CHF stamp) in Tim Holtz Black soot and heat embossed with clear embossing powder.  Then stamped the Heartfelt Creations swirly leaves in Versafine (clear) and gold embossed, then added a touch of colour to the leaves with Copics.

I'm entering this card in the following challenges:

DYSU - Warm Colours
GinaK Stamp TV - Faux layers
Simon Says Stamps: World Card Making Day
Dutch dare challenge - Fall is in the air

Don't let it weigh you down

This stamp set is a retired Saturday Night Post set by Cornish Heritage Farms.  I knew when I saw it that I had to have it, since it was so cute, useful too, and would be good for quick cards with no colouring.


I stamped the image in Espresso Adirondak ink on Aquabee marker paper, and added shading around it in pink with the Copic Airbrush, and then also added some brown craft ink for depth.  The background panel is an old SU stamp, stamped and shaded with Vintage Sepia Versafine.


I'm entering this card in the following challenges:

Cornish Heritage Farms - Use Twine
Flourishes - It's time to Think Pink
Simon Says Stamps: World Card Making Day
Art Impressions - Pink for Breast Cancer
Marks Finest Papers - Tutorial - Distressing
Pink Gem Designs - For the Girls
Crafty Mess Challenge - Anything Goes
Dream Valley - For the girls

Pink Piggy

Here's another cute piggy card, just to prove to my hubby that I don't buy stamps and then only use them once LOL!

The image is a pre coloured Doodle Pantry digi, though I added some airbrushing on the edges with my Copics using the Airbrush system.
I didn't put a sentiment on this as I wanted to be able to choose what to use it for when the time came to share it, but in keeping with the Pink theme for breast cancer awareness, I focused on making it as pink and girly as possible.

I am entering this in the following challenges:

Marks Finest Papers, Speedy and Friends: Recipe of 1 pc ribbon 2 diff embossing folders & 3 die cuts (I used the A2 Card Creator die for the main rectangle, plus a scalloped circle and classic circle)
Flourishes - It's time to Think Pink
Simon Says Stamps: World Card Making Day
OCL - Think Pink
Art Impressions - Pink for Breast Cancer
Sassy Studio Designs - Pink
Copic Oz - Make it Pink AND use Copics

Sending Hogs

Here is another sweet and definitely girly card.  I wanted something that could be sent to a woman dealing with health issues, that would be encouraging and make her smile.


The image is a pre coloured one from Doodle Pantry.  I printed the face a couple of extra times, cut out the head and snout and layered them on top with pop up doet.  Layering is with the A2 Card Creator dies.  Chipboard, ribbon, flower and button from my stash.

I'm entering this card in the following challenges:

CDAC progressive challenge CDACPC21
Marks Finest Papers FOSTV - use chipboard (the green corner piece)
Flourishes Timeless Tuesday - Think Pink
Simon Says Stamps: World Card Making Day
OCL - Think Pink
Cutie Pie Challenge - Use a Digi
Happy Campers - PInk and Brown

Old friend

Since I've dug out this old, dust covered Gina K stamp set, I've had lots of ideas how to use it.  I remember wanting to get it for months, and then getting it finally, using it a few times, and then shelving it.  I think it was the first non-wood mounted stamp I ever got, and that could have been part of the reason.


My challenge was to use it to create a card that would be encouraging to an older person.  I used purples and deep hunter green, as well as the frilly edges and feminine ribbon, all of which to me seem to be things that would be enjoyed by an older ribbon.  There is lots of texture here - both the image and sentiment are heat embossed and the scalloped frilly edge also gives something for someone to run their fingers over.  The sentiment is one that an older person would be able to appreciate.

I am entering this card in the following challenges:
GinaK Stamp TV MIUM - For the elderly
Shopping our Stash - Go Green  -  hard to see in this photo (really got to deal with new camera issues!) but the tree and sentiment are both in embossed hunter green
Cute Card Thursday - Lotsa Ribbon
Crafty Bloggers Network - Anything Goes
Simon Says Stamps: World Card Making Day

Earthy forest

Now that I have the faux layer technique going, I wanted to play with it a bit more.  Here is a more "all purpose" card that I think would work for a man or woman.
I used the masking and sponging technique per the tutorial at Gina K Stamp TV.  I also used the technique of creating an impression with die cuts and embossing mat to create extra borders.

Once again, I think this paper, Neenah 110lb, was a bit too flimsy for this technique.  I'm thinking I may cut off the front and then layer it on a brown base, but then I have to find the "perfect" brown to coordinate, so we'll see.  For now it is going in my completed card bin.

The image is Gina K.  The sponging was first done with a layer of Tim Holtz Distress ink skattered straw, but it came out really streaky from the sponging, so then I put a layer of brown craft ink overtop, focused to be darker on the edges, and it smoothed it out nicely.  The black trees are stamped using Tim Holtz Distress Ink Black Soot.  The embossed borders are the A2 Spellbinders Card Creator dies.

I'm entering this card in the following challenges:

Tammy's Scrapin Corner - Fall colours
DYSU - Warm Colours
GinaK Stamp TV - Faux layers
Simon Says Stamps: World Card Making Day
Dutch dare challenge - Fall is in the air

Faux layers

Ha ha, success!  After two failed tries last night I managed to create a beautiful faux layer card.  


At the GinaK stamp TV site they have a challenge to create a faux layer card using a die cut to create a stencil.  I've done this before, but not in quite a while.  Here are my findings:
  1.  You need to use good quality card stock that is sturdy.  Here I'm using Neenah 110lb Solar Crest and it's still too flimsy to be a really good card.  Definitely don't use your cheap Staples paper for this.
 2.  Further to the above point, trying to heat emboss (which I did here) on a single layer card, unless the paper is really fabulous (like the GinaK 120lb) is asking for challenges since it slightly warps the paper.
3.  When you are doing a card like this and dealing with ink be really careful, since it's easy to smear or get an inky finger tip mark on the edge.  On busy multi layer cards with lots of embellies it's easy to hide those oopsies under something, but here there is no forgiveness.
4.  Craft ink sponges on smoother and softer than regular die ink, with a much nicer finish.

So, to make this card I created a stencil using a Spellbinders die.  Then I sponge on navy craft ink (SU).  I stamped the trees using Tim Holtz Black Soot Distress Ink, then put clear embossing powder over that and heat set.  I used a tiny paintbrush to add pearly white paint to it and let it dry, then added some ribbon and edging from the fabric store.

I'm entering this in the following Challenges:
GinaK Stamp TV - Faux layers
Simon Says Stamps: World Card Making Day
Charisma Cards - Bada Bling
Less is More - Silver

Saturday, October 6, 2012

Sweet birdbath

And another quickie to end off World Card Making Day for me.

For this card I used a pre coloured digi image from Doodle Pantry.  I do love these, though they quickly decimate the ink supplies in my printer.
I loved this image as soon as I saw it.  We have not one, but TWO birdbaths in our garden, as well as a bird feeder, and I love to watch the birds drink and wash in the birdbath.

I'm entering this card in the following challenges:
Stamping with Dragon - Animals
Cutie Pie Challenge - Use a Digi
Doodle Pantry - Use a doodle pantry image

Woodland Ornament

So, world card making day wasn't the biggest card making day for me, but I do have another creation to share, this one Christmas themed.


The dies used are all Spellbinders, and stamp is Gina K.  I used Neenah Solar White 110lb.

I started off this card with the intention of playing along with the Gina K challenge today to do a faux layer.  I've done this several times in the past, since it is great for quick cards that are mailable, however the first attempt (this one) I stamped the trees properly on the left side, but when I went to add a few more on the right I stamped them side ways LOL!  So I put a layer overtop to hide it, which actually looks better I think anyway.

Unfortunately, then, this card didn't qualify for that challenge, so I started again, and then smeared the trees when trying to spread glitter, and so for now, I decided to move on.

I am though, entering this card in these following challenges:

Joans Garden - Create a christmas scene using a stamp, a die, and at least one tree
Little Miss Muffet - Simplicity
Simon Says Stamps: World Card Making Day

World Card Making Day

This is a happy crafty day for us card makers, since it is World Card Making day.  To celebrate, I wanted to share this card with you.

I love this image by Mo Manning, called Bismarck.  He is super quick and easy to colour and just so cute!  This card was really quick and easy to make.
The sentiment is from Stampin up, the sweet dog is Bismark by Mo Manning.  I cut both layers out with the A2 Card Creator dies from Spellbinders, and used the die cut as a stencil when I added some airbrushing to the background using Copics, so it looks like there is an additional layer.

I hope you all have some crafty time to spend today making something fun or useful, and that for those of you in Canada, you are also enjoying some Thanksgiving festivities.

I am entering this card in the following challenges

Joan's Garden: World Card Making Day  -- Please either play along today or vote for me here: http://www.atjoansgardens.com/2012/10/world-card-making-day-challenge.html
Simon Says Stamps: World Card Making Day
Mo's DP2 Challenge: Anything goes